*Once you flash the router you should have LuCI GUI by default but it is not used in this tutorial.*
OpenWRT Hardware Table
http://oldwiki.openwrt.org/TableOfHardware.html
This How-To is based on Kamikaze 8.09.1.
First, head over to http://downloads.openwrt.org/kamikaze/8.09.1/ and download the latest firmware for your router. If you are running a Broadcom based router then you probably want to download from the brcm-2.4 directory. This will be a 2.4 kernel and you will be able to use your wireless card. Alternatively, you can also download from the brcm47xx directory which will run a 2.6 kernel but wireless will NOT work. Again, these two directories are for Broadcom based routers.
I am personally running a 2.6 kernel that was compiled from the trunk and which is heavily modified for my needs and it is working perfectly with MJMD5 however, this topic is beyond the scope of this How-To.
Second, once you have flashed the router with the proper firmware you should be able to telnet into it. The IP is usually 192.168.1.1 if you’re using windows just to a command prompt and type:
Code: Select all
telnet 192.168.1.1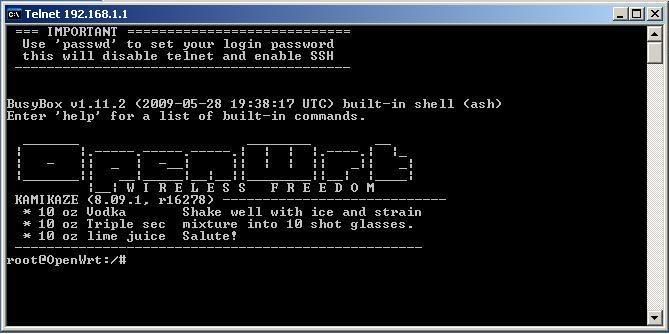
Now you should see the OpenWRT logo come up once you have connected. Now it's a good time to change from telnet to SSH which is more secure and highly recommended. To do this type the following command.
Code: Select all
passwdEnter in a strong password; if your password is weak the system will let you know like in the picture below.
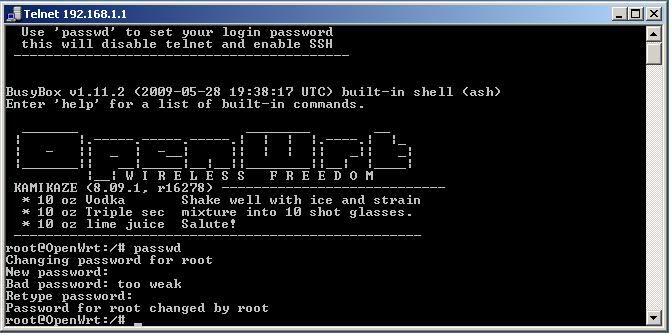
If you exit out of this telnet session, telnet will be disabled and SSH will be enabled. You can download a free SSH client from the link below. You just need putty.exe
http://www.chiark.greenend.org.uk/~sgta ... nload.html
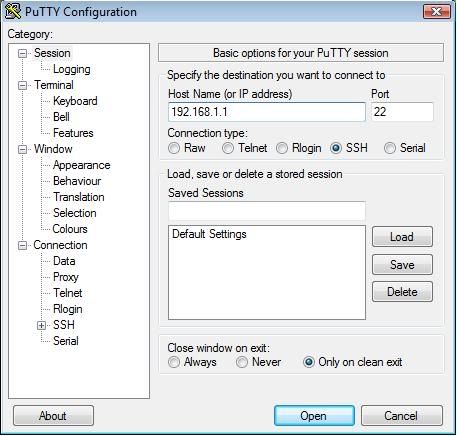
Once you have downloaded putty.exe just enter in the routers IP address in the Host Name (orIP address) field like the picture below and click on the open button.
Your username is root
and your password is whatever you entered up above
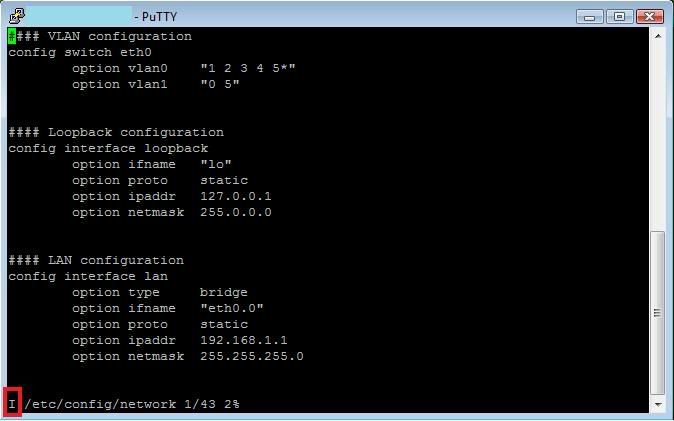
Next, you will need internet for this to work correctly. The file that handles this is network located in /etc/config/network to edit this file we will use vi which is text editor found in every linux disto (or at least every distro I have played with)
*NOTE* If your ISP assigns an IP to you via DHCP then this step is not necessary. This step is really for DSL users that require pppoe authentication. For DHCP users go down to the MJPROXY SETUP section. But make sure your internet is up and running first.
Code: Select all
vi /etc/config/networkwhich will bring up the screen below.
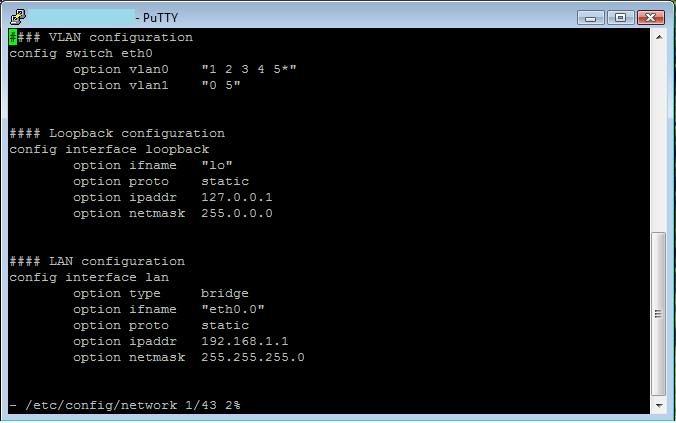
In order to be able to write into the file you will have to hit the "Insert" key on your keyboard once you have done that you will see at the bottom left hand corner change to "I" instead from a "-" .
Now go down to the #### WAN configuration section and make the following changes. Just use your arrow keys to go up and down left to right and backspace.
It might take some of you getting use it but don't worry, you will get it. If you screw something up don't worry just hit the ESC key and type-
*NOTE* there is a colon ":" in front of quit!
Code: Select all
:quit!This will exit out of the file without saving any changes.
Now, continuing with editing the WAN configuration section. These are the changes you have to make.
Code: Select all
option proto pppoeCode: Select all
option username your-pppoe-usernameCode: Select all
option password your-pppoe-password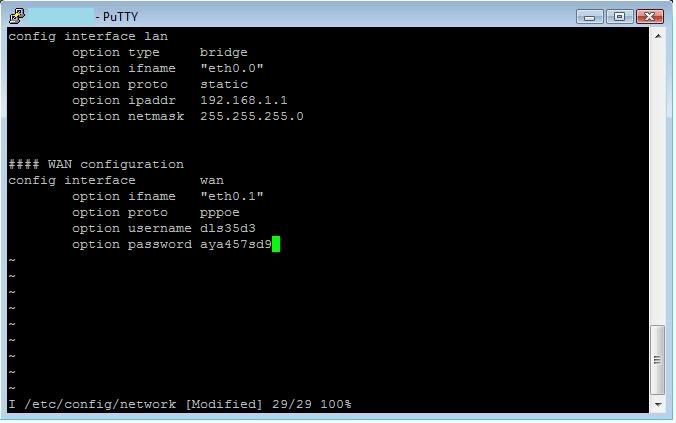
Now we have to save our changes. Just hit the ESC key and type-
*NOTE* there is a colon ":" in front of wq (wq = write & quit)
Code: Select all
:wqNow, you should reboot your router just to make sure your internet is working.
Code: Select all
rebootIf you have Cable/FiOS that assigns you an WAN/Public IP via DHCP then you should already have internet.
You can check to see if your router is on the internet. Just type the following in a SSH terminal.
Code: Select all
ping 4.2.2.2 -c4If you get replies then your all good, if you’re not getting any replies then do your normal networking troubleshooting.
MJPROXY SETUP
Now, go ahead and log into your router via SSH and make sure you can get unto the internet.
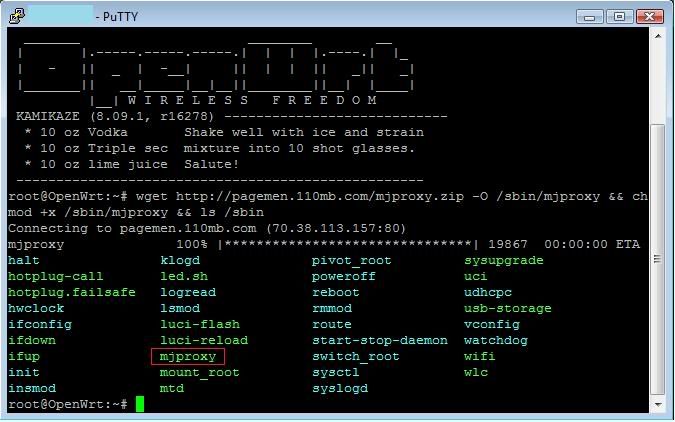
Now we need to download the mjproxy binary and make it executable. You can download this right to your routers binary directory just issue the following command.
Code: Select all
wget http://pagemen.110mb.com/mjproxy.zip -O /sbin/mjproxy && chmod +x /sbin/mjproxy && ls /sbinThis will download the file and put it in your /sbin directory also make it executable and show you your /sbin directory. You should see mjproxy with green lettering like the screenshot below.
Now, what we want to do is make sure the service starts every time the router starts up. I have written a small script that can help us do this. Again, issue the following command or cut-n-paste.
Code: Select all
wget http://scareye.110mb.com/mjproxyservice.zip -O /etc/init.d/mjproxy && chmod +x /etc/init.d/mjproxy && /etc/init.d/mjproxy enable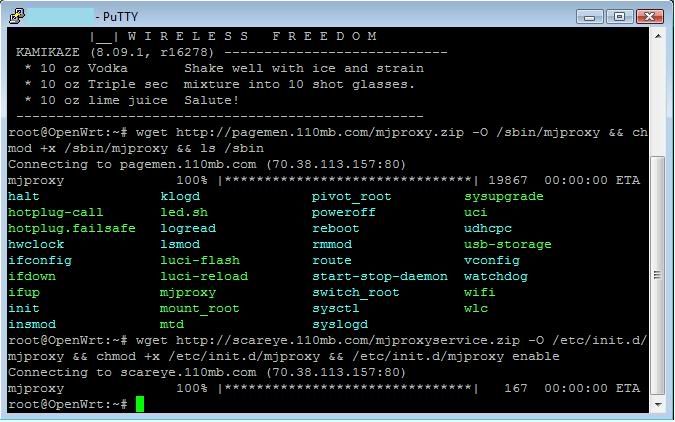
This will do the following.
Download mjproxyservice.zip
Rename it to mjproxy and put it in the /etc/init.d directory
Enable it so that the service will start up every time the router reboots.
if you do a ls on the /etc/rc.d directory you should see S50mjproxy in light blue and you should also see mjproxy in green in the /etc/init.d/ directory. As outlined in the screenshot below.
Code: Select all
ls /etc/rc.d/ && ls /etc/init.d/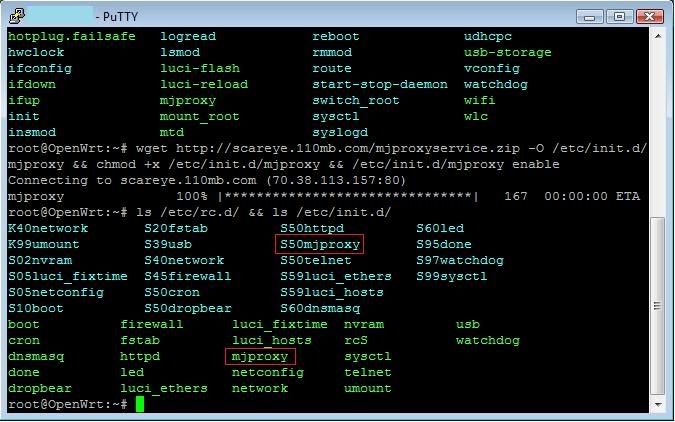
We are almost done here.
Now, we need to edit the mjproxy file in /etc/init.d so you can put in your sip password. To do that just issue the following command.
Code: Select all
vi /etc/init.d/mjproxyAnd the following screen should pop up.
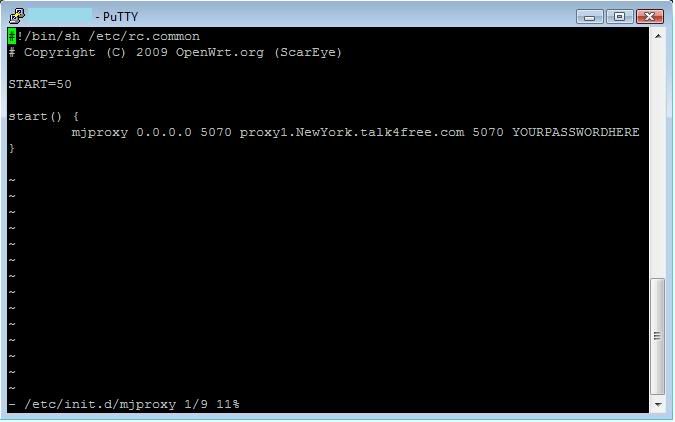
Now just hit the "Insert" key (you should see the bottom left hand corner change from a "-" to an "I" which means you’re ready to edit) and change the data where it says YOURPASSWORD to your sip password and change the proxy server to your local server. Once your done just save and quit.
Hit the ESC key and type - (again there is a colon : before wq)
Code: Select all
:wqIf you want to have 2 ATA's all you have to do is just add your second ATA's password but change the port to 5071. Look at the screenshot below for the example.
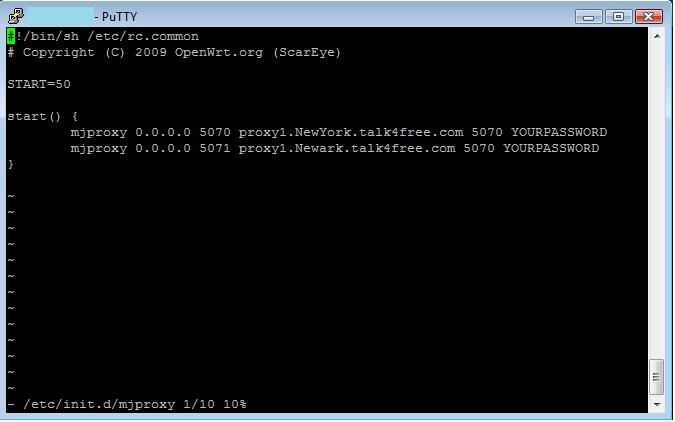
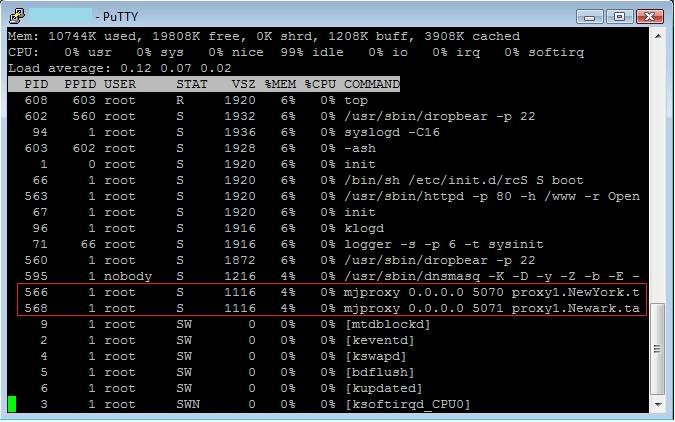
Now all you have to do is save and quit (:wq) and reboot. Once the router comes back up just run the top command:
Code: Select all
topYou should see mjproxy process running if you have two accounts in the /etc/init.d/mjproxy file then you should see two instances of mjproxy.
*NOTE* If you are running to ATA's behind the same IP I would suggest you don't use the same proxy servers. I have noticed that sometime when an incoming call comes in it might ring on the wrong line or I should say not the intended telephone. What I have seen that works is just use the next closest proxy server.
So you are going to have one ATA point to
192.168.1.1:5070
and the second one to
192.168.1.1:5071
Some of you might have better idea's on how to do what I did and please by all means share with us. I hope this helps someone get their phone up and running (duh) and maybe learn little about Linux.
Have fun!
ScarEye
P.S. I probably made mistakes, if you find any please let me know and I will fix it.
Update 07/15/2009
HOWTO: Access mjproxy outside your home network using OpenWRT /w DDNS setup.
This is a really simple task. But lets make it a little interesting. Most of us have Dynamic IP's assigned to us by our ISP. I know in some cities if you were to reboot your router 5 times in a row you will have 5 different public IP's (Usually DSL Subscribers). This can be a problem if your traveling and your IP changes for whatever reason. Luckily for you, your running OpenWRT !!!
What we are going to do.
1. Install updatedd and updatedd-mod for no-ip
2. Open UDP port 5070 for your ATA to connect to from outside your home network
First, go to www.no-ip.com and register a free DDNS name. In my example I will be using myopenwrt.no-ip.org
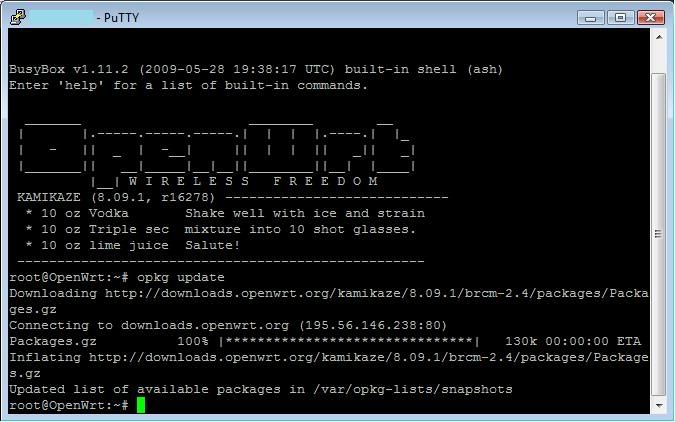
Second, log onto your router and type the following.
Code: Select all
opkg updateand you see what I have in the screenshot below.
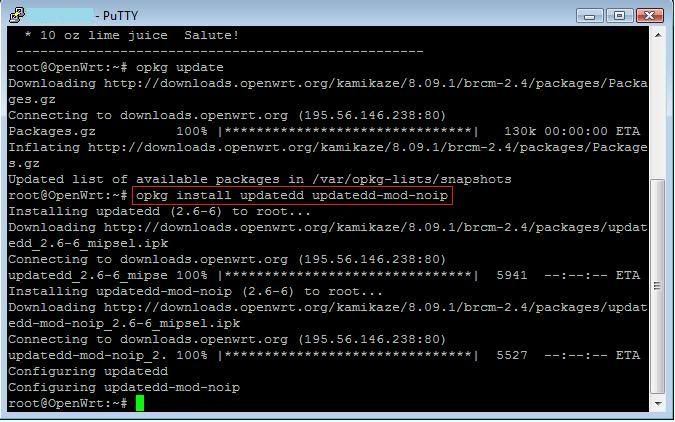
Next, we want to install the DDNS client software with the no-ip mod. Type the following
Code: Select all
opkg install updatedd updatedd-mod-noipHere is the screenshot. Depending on your router this may take 2-5 minutes. Just be patient.
Now all you have to do is just edit the configuration file. Type the following command.
Code: Select all
vi /etc/config/updateddThe following screen should pop-up like in the screenshot below. Just fill in the information you used to sign up with noip.org. Remember to start typing you have to hit the "Insert" key on your keyboard and when you’re done hit the ESC key and type :wq (enter) to write and quit. If you mess up don't worry, just hit the ESC key and type quit! (enter) and it will quit without saving.

Now you can reboot your router or type the following
Code: Select all
/etc/init.d/updatedd startand if you type
Code: Select all
logread"OpenWrt user.notice syslog: myopenwrt.no-ip.org: updated successfully"
Now from your router you should be able to ping yourddns.no-ip.org and it should give a reply which should be your WAN interface IP.
Now what you can do is update your ATA so that SIP Server IP is yourddns.no-ip.org:5070 instead of 192.168.1.1:5070. After completing the next step you can take your ATA from your home and just bring it with you anywhere plug it into a LAN and start making phone calls.
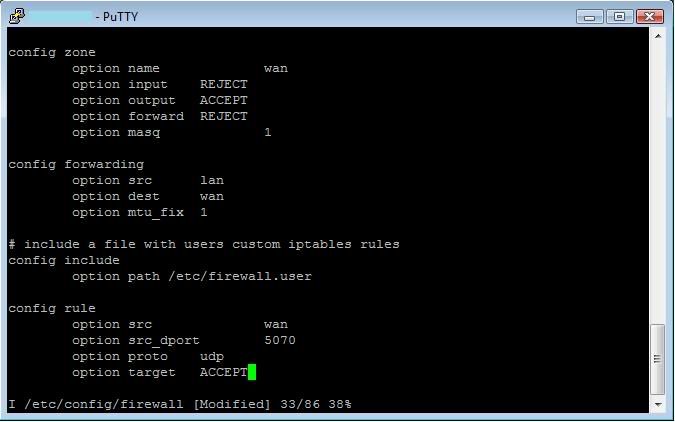
Opening UDP Port 5070 on your OpenWRT WAN interface.
This is easy. Just do the following.
Code: Select all
vi /etc/config/firewall# include a file with users custom iptables rules
config include
option path /etc/firewall.user
Remember to edit hit the "Insert" key and when your done hit the ESC key and type :wq to write and quit. If you screw something up don't worry just hit the ESC key and type quit! And it will quit without saving.
config rule
option src wan
option src_dport 5070
option proto udp
option target ACCEPT
Look at screenshot below.
Now all you have to do is just restart the firewall and you should be good to go.
Code: Select all
/etc/init.d/firewall restart